Posted in Christmas Crafts, Crafting, DIY, Dollar Store, Dollar Store Crafting, Hand Painted, Home Design, Interior Design, Painting, Upcycling

Personalized Wooden Picture Frames

Each year I get pictures of my son and give them to family in a picture frame.  This year I found wooden unfinished frames for $4.00 and decided to paint and personize them for each recipient.  I also made a moasiac wooden frame that hang the pictures from wires that I converted from dollar store “canvas” signs.

This was a great way to add a personal touch using colors and themes enjoyed by each individual for little cost.

MATERIALS NEEDED:

  • Wooden Frame
  • Dollar store “canvas” signs
  • Acrylic paint – in desired colors
  • Crafting jewels and scrapbooking adornments as desired
  • Staple gun and staples
  • Hot glue gun and glue
  • Paperclips or small clothes pins
  • Crafting wire
  • Needle nose pliers
  • Wire cutters

Since you don’t really need a step by step tutorial on painting the frames I will just provide instructions for building your moasiac wooden frame that holds pictures from wires.

  1. Tear “canvas” paper off of the frames.
  2. These were approximately 9 x 6 inches tall, so I measured 1.5 inches on each side to mount together with space in the center for a smaller picture.
  3. Hot glue together and then add a couple of staples for added support.
  4. Paint the frame as desired.
  5. Staple each side where you want to secure the wire to hang your pictures cut wires and sucure wire using needle nose pliers to make a knot around the staples.
  6. Use paperclips or mini clothes pins to hang pictures.

I love DIY because it allows for a personalized touch, but also if you think outside of the box you can do it for little cost too!  Happy Crafting and merry Christmas everyone!


    Posted in Christmas Crafts, Crafting, DIY, Dollar Store Crafting, Hand Painted, Painting

    Commemorative Fingerprint Snowman Ornaments

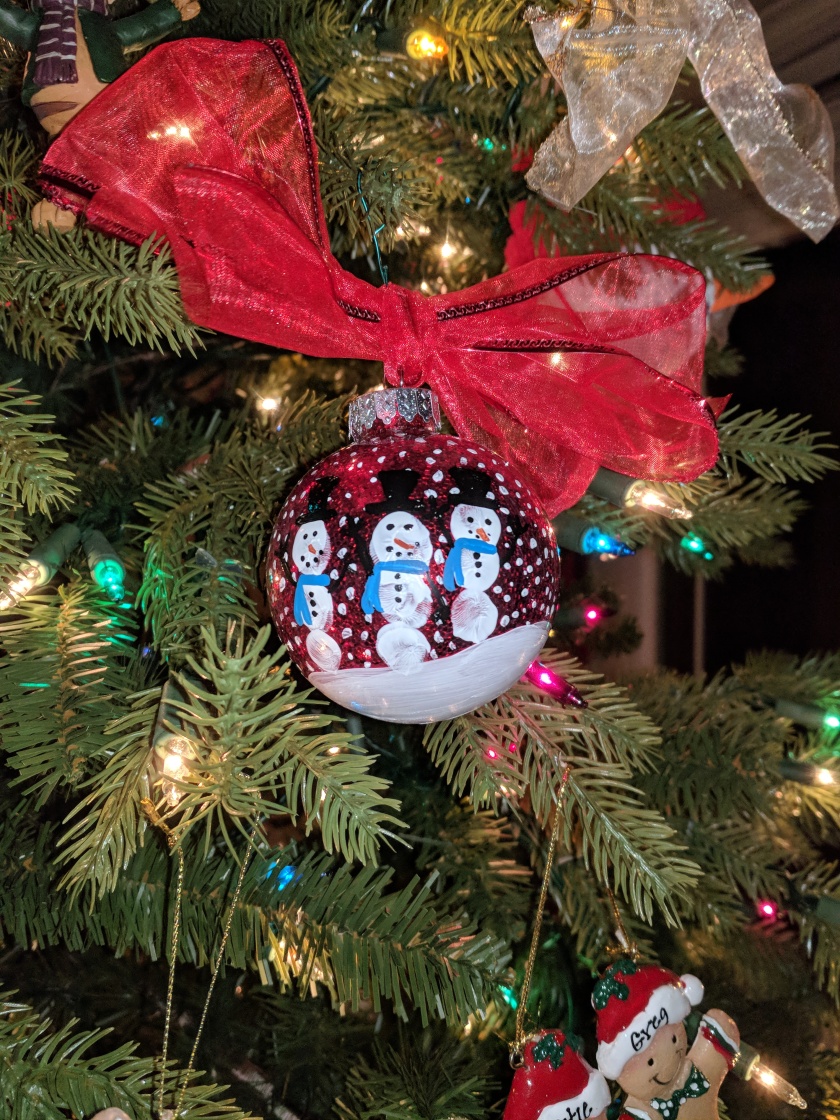
    A tradition in my family has been to collect an ornament each year, but ever since I discovered my love of crafting I have been making my own.  This year my son and I did a special collaboration with him lending me his finger tips to make my snowmen.

    This is a really simple and cute craft that commemorates tiny fingers for future years.  

    MATERIALS NEEDED:

    • Red glitter
    • Mop and Glow
    • Clear plastic or glass ornament
    • Acrylic paint – white, black, blue, and orange
    • Red wire ribbon
    1. Pour Mop and Glow into the ornament and swish around the the inside plugging the end with your finger tip; empty the excess.
    2. Pour red glitter into the bulb and plug the end with your finger tip and shake until glitter coats the entire inside; add more if needed continuing to shake.
    3. Dip finger tip into white paint and make three dots on top of each other in the shape of a snowman.
    4. Use a fine tip paint brush and dot the front with snowflakes. 
    5. Draw a black line across the top of his head for the brim of the top hat and draw an hour glass shape filling it in black for the remainder of the hat.
    6. Dot the eyes and add the buttons.
    7. Using the blue paint, draw a line across the neck of the head and then two more going downward for the tails.
    8. Draw the tree branche arms using black paint.
    9. Paint the bottom white for snow on the ground.

    This may be ane of my absolute favorites this year!  Happy crafting and merry Christmas!

    Posted in Christmas Crafts, Christmas DIY Gifs, DIY, Dollar Store, Dollar Store Crafting

    DIY Dollar Store “Snow-Tex”

    For Christmas this year I am making my own snowman head ornaments and I need a large amount of Snow-Tex, but the cost of it being $3.99 for a meager 4 oz jar is not happening!  I decided to try my own recipe for it fresh from the dollar store – well mostly anyway.  

    This product is simple, easy, and will most certainly save you money!  It’s just two simple ingredients:

    • White sand
    • White acrylic paint

    Mix sand and paint until you get a thick, spreadable paste and voila!  You won’t be able to see a difference – except in your wallet!

    On the left DIY version and on the right $3.99 4 oz jar of Snow-Tex!